


Good digital images of the bugs you've found can help us to quickly and effectively evaluate your specimens. You need not be a professional photographer to take such images. Note: Do not send us images of bites or lesions, as we do not diagnose medical conditions.
Items needed
- Your specimen(s)
- Digital camera, camera-phone, flatbed document scanner, or an IDmyBUG® ProScope device
- Sheet of white paper (or similar grid paper) to use as a background
- Coin (such as a dime or penny) or suitable companion object (like a small ruler) for size comparison
- Good source of light (natural light from a window is usually fine) or backlighting
- A means to steady the camera or imaging device
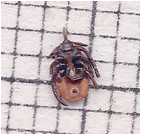
If your specimens are dead, then you can proceed directly to imaging them. Live creatures, however, may wander away while you’re trying to take their portraits, so to stop them from escaping, put them into a small bag, jar or other container and then place this into your freezer for about an hour. This will immobilize and kill almost any kind of live creature. Try to capture an image of the top and another from the bottom of the creature. Views of both top and bottom will afford us the best chance of offering you an answer with assurance.
Image capture using a digital camera or camera phone
Place the sheet of clean white paper on a stable surface. Illuminate it with natural light from a window, or direct light from a lamp nearby. You can also try back-lighting the creature if you have a suitable light source for that purpose.
Place your dead or frozen creatures onto the sheet of paper. If they are within a plastic bag, take them out. Use tweezers or forceps to handle and position them as gently and precisely as you can. Once they’re dead, they cannot bite, sting or otherwise bother you. Try to arrange each bug near a coin or ruler that we can reference for sizing purposes. This allows us to more accurately gauge the size and dimensions of the bug. Alternatively, you can use a sheet of graph paper (but we’ll need to know the size of the smallest grid box in order for this to be useful).
Set your camera’s resolution to fine or another suitable setting for high resolution images. Check your camera’s manual for instructions if needed. An image of 1MB usually provides sufficient resolution for our needs.

Most digital cameras have a MACRO function designed to allow you to take close-up images. The MACRO symbol may appear as a flower with petals. Selecting this option allows the camera to focus on items very close (less than a foot to about 3 feet away). You may be able to use the zoom feature (if equipped) to enlarge the specimens, or simply move the camera closer or further away to ensure that specimen is in crisp focus.

If you don’t have a MACRO setting on the camera you may still be able to capture a good picture. Use the standard settings (as you would for taking a picture of a person) and use the zoom feature to enlarge the creatures. If you’re too close, the image will be out of focus. If it is not in crisp focus, then try again. Move farther away before you zoom in on the specimen. Steady the camera before you take the picture! Mounting the camera on a tripod is best, but you can steady the camera and your hands by resting your elbows on a stack of books or the back of a chair.
If you don’t have a digital camera, you can use a camera-equipped cell phone or an iPad™ or other camera equipped tablet device. Many cell phones can capture images of sufficient quality, especially if you use the built-in macro/zoom/magnnify mode. Check your owner’s manual for instructions on using your device. If you have a hand lens or magnifying glass, you can get an even better image by placing that lens in front of the camera phone lens. Adjust the distances between lenses and specimen to get the best image possible.
Image capture using an office document scanner
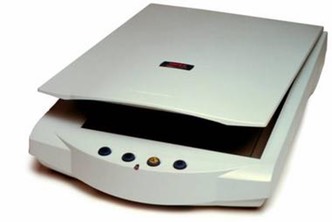
Many offices and homes are equipped with a dedicated flatbed document scanner or an all-in-one printer/copier/scanner. A scanner can be used to quickly and easily capture images that will be sufficient for identification purposes. We suggest you do not use the document feeder part of the scanner! That can get messy.
We suggest you gently place the dead tick (or bed bug, louse, etc.) directly on the glass surface of your flatbed scanner. If you can, lay a sheet of paper (ideally graph paper) atop the specimen, with the printed grid facing downwards. If the specimen is flat, then you can gently lower the cover, but be careful not to crush it. If the specimen is engorged or will be damaged by lowering the cover, then just lay a sheet of paper over the entire glass surface to protect your eyes and to improve the scanned image.
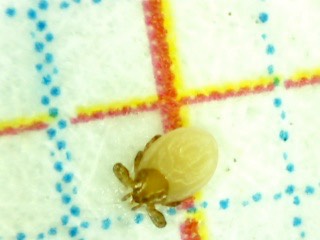
Tick specimen captured & scanned using gridded paper background
Most scanners can be set directly (or using the software on the attached computer) to select the resolution of the scanned image. This is important. The default resolution of many scanners may provide just enough detail to allow an expert to offer a general answer, but it may not suffice for a precise conclusion with assurance. Select the best resolution possible from your scanner, scan in color, and save the image as a .jpg, .png, or .tiff file. If all else fails, a .pdf file will work. Then CROP the image to reduce the overall file size! We only need the bug itself along with your reference object to gauge the size. The images presented below demonstrate what is possible at different scan resolution settings.
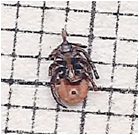
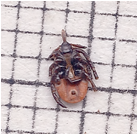
1200 dpi (OK) 2400 dpi (Better) 4800 dpi (Best)
The above images show an adult female deer tick imaged with a flatbed scanner. Images scanned at 2400 or 4800 dpi afford superior resolution. We can magnify/enlarge those images and discern far more information than scans captured at lower resolution. Note that the smallest boxes on this graph paper are 1mm square. You can use other kinds of graph paper, but please tell us the grid size! Don’t have graph paper? That’s not a problem. Place a coin or a ruler next to the creature.
Once you have the image(s), upload and save your images to your computer and then attach these to our online Specimen Evaluation Form. We accept payment via PayPal or credit card for the evaluation of your specimen. Everything, including your images, can be submitted using the Specimen Evaluation Forms on the IdentifyUS website. If you have trouble getting good images, you can still send us your physical specimen in the mail or via courier service, however, we ask that you still complete a paper version of the Specimen Evaluation Form and send that in along with your creature. Make sure you provide us with complete and accurate contact information so that we can quickly and easily get back in touch with you regarding the results of our evaluation.
If you have any technological problems, don’t worry. Just find a helpful, tech-savvy teenager who will likely be more than willing to lend a hand. Really! If you’re comfortable editing digital files, feel free to crop your photos to reduce unnecessary blank space and to minimize the file size. Our preferred format is .jpg or .png but we will be able to read images saved in any of the following formats:
- BMP
- JPEG
- JPEG 2000
- PNG
- TIFF
If you use JPEG compression, try to use a good-to-best compression setting as image quality is more important than overall file size. When in doubt send us the bigger, better image as we can always work with it and reduce image size on our own if we need to. Is this all too confusing? Don't worry. You can contact us through our customer support site and start a discussion with one of our experts directly from your web browser via help.identify.us.com